Tuesday, September 9, 2008

Integration of Oracle Financial Applications

untitled


Integration of Oracle Financial Applications

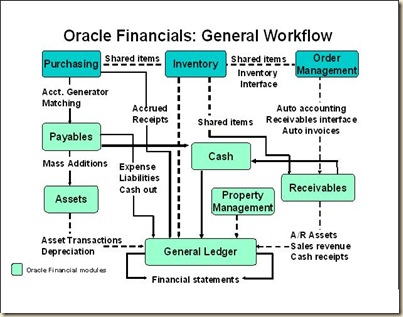
A general overview of the data flow between some of the Oracle Financial modules is shown in the diagram above. A brief discussion of the shared entities, functions, and what data is passed by each module to the General Ledger is included here for the purpose of better understanding how data flows through the application tables. Where appropriate in the sections on individual applications, a brief description is provided regarding how that module passes data to the General Ledger.

Shared Entities

Suppliers: Suppliers are defined in the PO_VENDORS, PO_VENDOR_SITES_ALL, and PO_VENDOR_CONTRACTS tables, discussed in the purchasing section of this book. Some products such as Purchasing, Payables, Assets, and Property Manager share supplier information.

Account Numbers

Account numbers are defined in the GL_CODE_COMBINATIONS table discussed in the General Ledger section of this book. Account numbers are referenced by all applications.

Items: Items are defined in the MTL_SYSTEM_ITEMS table, discussed in both the purchasing and inventory sections of this manual. Item information is stored in a table, which is shared by Purchasing, Inventory, Order Management, and Receivables.

Customers: Customers are defined in the HZ_PARTIES table, discussed in both the Order Management and Receivables sections of this manual. Customer information is stored in a table, which is shared by Order Management, Receivables, and some CRM applications.

Functions

In order to automate the process of generating account numbers in feeder systems, Oracle Financial applications provide functions that can be set up during your implementation to generate account numbers based on information entered in a screen. There are two of these functions:

Account Generator: The Account Generator (Flexbuilder in release 10.7) in release 11i can be used by the purchasing module to generate purchase order distribution accounts, by Fixed Assets to generate various asset accounts, and by the Shipment interface between order management and inventory to generate the cost of goods sold account. The Account Generator function takes parameters from the purchase order or whatever as inputs and uses these to determine the appropriate account number.

Auto Accounting:The Auto Accounting function is used by the Receivables module to determine the appropriate account numbers for sales revenue, Receivables, freight and taxes, based on inputs such as the salesperson, the item being invoiced, and the type of invoice.

Saturday, April 12, 2008

DBA Views

Storage Information

DBA_EXTENTS, DBA_FREE_SPACE, DBA_OBJECTS,

DBA_OBJECT_SIZE, DBA_SEGMENTS, DBA_TABLESPACES,

DBA_ROLLBACK_SEGS, DBA_UNDO_EXTENTS

Operating System

DBA_DATA_FILES, DBA_EXP_FILES, DBA_TEMP_FILES

Privileges

DBA_COL_PRIVS, DBA_PROFILES, DBA_ROLES,

DBA_ROLE_PRIVS, DBA_SYS_PRIVS, DBA_TAB_PRIVS,

DBA_UPDATABLE_COLUMNS

Indexes

DBA_INDEXES, DBA_IND_COLUMNS,

DBA_IND_EXPRESSIONS, DBA_IND_PARTITIONS

Tables/Views

DBA_TABLES, DBA_TAB_COLUMNS, DBA_TAB_PARTITIONS,

DBA_TAB_COMMENTS,

DBA_UNUSED_COL_TABS, DBA_VIEWS

Constraints

DBA_CONSTRAINTS, DBA_CONS_COLUMNS

Triggers

DBA_TRIGGERS, DBA_TRIGGER_COLS,

DBA_INTERNAL_TRIGGERS

Materialized Views

DBA_MVIEW_AGGREGATES, DBA_MVIEW_ANALYSIS,

DBA_MVIEW_DETAIL_RELATIONS, DBA_MVIEW_JOINS,

DBA_MVIEW_KEYS

Partitions

DBA_PART_COL_STATISTICS, DBA_PART_HISTOGRAMS,

DBA_PART_INDEXES, DBA_PART_KEY_COLUMNS,

DBA_PART_LOBS, DBA_PART_TABLES,

DBA_IND_SUBPARTITIONS, DBA_LOB_PARTITIONS,

DBA_LOB_SUBPARTITIONS

Objects, Methods and Types

DBA_OBJECT_TABLES, DBA_METHOD_PARAMS,

DBA_METHOD_RESULTS, DBA_TYPES, DBA_TYPE_ATTRS,

DBA_TYPE_METHODS, DBA_DIMENSIONS, DBA_LOBS

Operators

DBA_OPANCILLARY, DBA_OPARGUMENTS,

DBA_OPBINDINGS, DBA_OPERATORS

Summaries

DBA_SUMMARIES, DBA_SUMMARY_AGGREGATES,

DBA_SUMMARY_DETAIL_TABLES, DBA_SUMMARY_JOINS,

DBA_SUMMARY_KEYS

Miscellaneous

DBA_DB_LINKS, DBA_SOURCE, DBA_SEQUENCES,

DBA_SYNONYMS, DBA_USERS, DBA_OUTLINES,

DBA_JOBS, DBA_JOBS_RUNNING, DBA_LIBRARIES,

DBA_PENDING_TRANSACTIONS, DBA_RULESETS,

DBA_OUTLINE_HINTS, DBA_POLICIES,

DBA_SUBPART_KEY_COLUMNS, DBA_TS_QUOTAS,

DBA_JAVA_POLICY, USER_JAVA_POLICY

Dynamic Performance Views

Instance Level Tuning

v$GLOBAL_TRANSACTION, v$OBJECT_DEPENDENCY,

v$SHARED_POOL_RESERVED, v$SORT_SEGMENT,

v$SYSTEM_CURSOR_CACHE, v$SORT_USAGE, v$STATNAME,

v$SYSSTAT, v$SYSTEM_EVENT, v$TRANSACTION, v$LATCH,

v$LIBRARYCACHE, v$ROLLSTAT, v$ROWCACHE,

vRSGASTAT, v$SQLAREA, v$SQLTEXT, v$WAITSTAT

Recovery Based Views

v$ARCHIVE, v$ARCHIVE_DEST, v$BACKUP_CORRUPTION,

v$BACKUP_DEVICE, v$BACKUP_REDOLOG,

v$DELETED_OBJECT, v$RECOVERY_LOG, v$RECOVER_FILE,

v$ARCHIVED_LOG, v$BACKUP, v$BACKUP_DATAFILE,

v$BACKUP_PIECE, v$BACKUP_SET,

v$RECOVERY_FILE_STATUS, v$RECOVERY_STATUS,

v$DATABASE_BLOCK_CORRUPTION,

v$DATABASE_INCARNATION

Cache Views

v$CACHE, v$LIBRARYCACHE, v$SUBCACHE,

v$DB_OBJECT_CACHE, v$ROWCACHE

Control File Views

v$CONTROLFILE, v$CONTROLFILE_RECORD_SELECTION

Cursor and SQL Views

v$SYSTEM_CURSOR_CACHE, v$OPEN_CURSOR, v$SQLAREA,

v$SQL, v$SQLTEXT, v$SQLTEXT_WITH_NEWLINES,

v$SQL_CURSOR, v$SQL_BIND_METADATA,

v$SQL_SHARED_MEMORY, v$SQL_BIND_DATA,

v$SQL_WORKAREA, v$SQL_WORKAREA_ACTIVE

Security Views

v$ENABLEDPRIVS, v$PWFILE_USERS

Session Views

v$ACCESS, v$MYSTAT, v$PROCESS, v$SESSION ,

v$SESSION_CONNECT_INFO, v$SESSION_CURSOR_CACHE,

v$SESSION_EVENT, v$SESSION_LONGOPS,

v$SESSION_OBJECT_CACHE, v$SESSION_WAIT, v$SESSTAT

(needs v$statname, v$session join), v$SESS_IO

Latch and Lock Views

v$BUFFER_POOL, v$CACHE_LOCK, v$CLASS_PING,

v$DLM_CONVERT_LOCAL, v$DLM_CONVERT_REMOTE,

v$DLM_LATCH, v$DLM_MISC, v$ENQUEUE_LOCK,

v$EVENT_NAME, v$FALSE_PING, v$FILE_PING, v$LATCH,

v$LATCHHOLDER, v$LATCHNAME, v$LATCH_CHILDREN,

v$LATCH_MISSES, v$LATCH_PARENT, v$LOCK,

v$LOCK_ACTIVITY, v$LOCK_ELEMENT, v$LOCKED_OBJECT,

v$LOCKS_WITH_COLLISIONS, v$PING, v$RESOURCE,

v$RESOURCE_LIMIT, v$TRANSACTION_ENQUEUE, v$LOCK

Instance Views

v

$ACTIVE_INSTANCES, v$BGPROCESS, v$BH,

v$COMPATIBILITY, v$COMPATSEG, v$COPY_CORRUPTION,

v$DATABASE, v$DATAFILE, v$DATAFILE_COPY,

v$DATAFILE_HEADER, v$DBFILE, v$DBLINK, v$DB_PIPES,

v$INSTANCE, v$LICENSE, v$OFFLINE_RANGE, v$OPTION,

v$ROLLSTAT, v$SGA, v$SGA_STAT, v$TABLESPACE,

v$TRANSACTION, v$UNDOSTAT, v$VERSION

Fixed Views

v$FIXED_TABLE, v$FIXED_VIEW_DEFINITION,

v$INDEXED_FIXED_COLUMN

Miscellaneous Views

v$TIMER, v$TYPE_SIZE, v$SEQUENCES

MTS and Parallel Server Views

v$CIRCUIT, v$DISPATCHER, v$DISPATCHER_RATE, v$MTS,

v$QUEUE, v$REQDIST, v$SHARED_SERVER, v$THREAD

File Mapping

v$MAP_LIBRARY, v$MAP_FILE, v$MAP_FILE_EXTENT,

v$MAP_ELEMENT, v$MAP_EXT_ELEMENT,

v$MAP_SUBELEMENT, v$MAP_COMP_LIST,

v$MAP_FILE_IO_STACK

Essential Java Configuration For First Time

Setting Environment Variables:

1.   User Variables

Ø classpath

C:\Program Files\Apache Software Foundation\Tomcat 5.5\common\lib\servlet-api.jar;C:\bea\weblogic81\server\lib\weblogic.jar; %JAVA_HOME%\bin;C:\bea\jdk141_02\lib\tools.jar;.

----------------------------------------------------------

For running web-services

 Ø classpath

C:\ same as top\ C:\bea\weblogic81\server\lib\webservices.jar;.

webservices.jar is used for web-services programming


Ø path

C:\bea\jdk141_02\bin; %path%; C:\bea\weblogic81\server\bin;.

Path to look for ant tool


Ø JAVA_HOME

C:\bea\jdk141_02


Ø Path

C:\bea\jdk141_02\bin;.


2. Setting System Variables

 Ø Catalina_home

C:\Program Files\Apache Software Foundation\Tomcat 5.5


Ø classpath

C:\Program Files\Apache Software Foundation\Tomcat 5.5\common\lib\servlet-api.jar;C:\bea\weblogic81\server\lib\weblogic.jar;%JAVA_HOME%\bin;C:\bea\jdk141_02\lib\tools.jar;.


Ø JAVA_HOME

C:\bea\jdk141_02


Ø path

C:\WINDOWS\system32;C:\WINDOWS;C:\WINDOWS\System32\Wbem;%JAVA_HOME%\bin;%path%;C:\Program Files\QuickTime\QTSystem\;.;


Ø TOMCAT_HOME

C:\Program Files\Apache Software Foundation\Tomcat 5.5


Ø WL_HOME

C:\bea\weblogic81

Sunday, March 30, 2008

Enabling / Disabling buttons / functions in custom forms.


  • Attach APPCORE.pll (Intern it will automatically link other related .pll)
  • Define parameter (naming convention can be followed)

            (Application Top)_(Form Name)_(Button/Function Name)


  • Copy Trigger from APPSTAND.fmb

           WHEN_NEW_FORM_Instance

            PRE_FOME

            WHEN_WINDOW_CLOSE


  • Add following to WHEN_NEW_FORM_INSTANCE

If Not Fnd_Function.Test((Application Top)_(Form Name)_(Button/Function Name)')

Then

                        Set_Item_Property('Blockname.ACTION',Displayed,Property_False);

End If;

System Admin à Application à Function

abc

  • Define function (Application Top)_(Form Name)_(Button/Function Name) , select type=SUBFUNCTION , attach original form name.
  • Add the function name in related menu
  • Exclude function from Responsibility definition.


Saturday, March 29, 2008

Linux How-To

Finding Your Linux Release

This you can get from a static file redhat-release located in the /etc  directory

view /etc/redhat-release
Red Hat Enterprise Linux AS release 4


NFS mounting on Linux

Supposing you want to mount a u01/sam on Node_A to Node_B

Configurations on Node_A
edit the /etc/exports file
vi /etc/exports
add the filesystem to mount
/u01/sam ro Node_B

you can either use the option ro which means read only or in case you wish to allow node_b to write into the filesystem use  the rw option which is read writeable.

The change in exports file takes effect only after the restart of your NFS service daemon. use the service command to do  that.

# service nfs restart
Shutting down NFS mountd:                                  [  OK  ]
Shutting down NFS daemon:                                  [  OK  ]
Shutting down NFS quotas:                                  [  OK  ]
Shutting down NFS services:                                [  OK  ]
Starting NFS services:                                     [  OK  ]
Starting NFS quotas:                                       [  OK  ]
Starting NFS daemon:                                       [  OK  ]
Starting NFS mountd:                                       [  OK  ]

Configuration for Node_B

On Node_B simply create the mount point to hold the shared file system and mount it using the mount command.

#mkdir sam
#mount -t nfs Node_A:/u01/sam /sam

Setting Kernel Parameters

Most oracle products require certain kernel parameters to be set as a pre requisite for installation. Common kernel parameters include parameters for shared memory .

The /etc/sysctl.conf file takes care of your kernel parameters.
#vi /etc/sysctl.conf
kernel.shmmax = 2147483648
kernel.shmmni = 128
kernel.shmall = 2097152
kernel.sem = 250 32000 100 128
fs.file-max = 65536
net.ipv4.ip_local_port_range = 1024 65000

However changes made to this file take effect only after the next reboot.

The sysctl command can be used to set the kernel parameter at runtime in linux.

sysctl -w kernel.shmmax=2147483648

You must however make the change in the /etc/sysctl.conf so that it is permanent.

Increasing the Swap space at runtime

Imagine this, you start the OUI and your pre installation check fails due to insufficient swap space. Now I agree that you  got to check all this before starting the installation but just in case you missed it. You could always increase it on the  fly.

Check the memory on your server

# free -m
             total       used       free     shared    buffers     cached
Mem:          8117       3204       4913          0         77       2648
-/+ buffers/cache:        478       7639
Swap:          101          0        101

Now say you need to increase it by 500 MB for your server, first locate a place you can spare this 500 MB in my case i found  it in /u01

Use the dd command to create a swapfile

#cd /u01
# dd if=/dev/zero of=swapfile bs=1024 count=512000
512000+0 records in
512000+0 records out
# ls -ltr
drwx------   2 root   root     16384 May  1  2006 lost+found
-rw-r--r--   1 root   root 524288000 Nov 28 13:58 swapfile

Next issue the following two commands

# mkswap swapfile
Setting up swapspace version 1, size = 524283 kB
# swapon swapfile

Now check you memory again

# free -m
             total       used       free     shared    buffers     cached
Mem:          8117       2176       5941          0         45       1975
-/+ buffers/cache:        155       7962
Swap:          601          0        601

Bingo! here is your increased SWAP.

To make this change permanent add the line in your etc/fstab
/u01/swapfile swap swap defaults 0 0

Oracle Application 11.5.10 Installation Part#2

Rapid install is used to install Oracle Applications on any machine. With Rapid Install, you can perform these operations:

  • Install a new, fully configured Oracle Applications system, including the latest certified Oracle Applications technology stack and all patches, mini-packs, family packs, and other updates available at the time of this release.
  • Lay down the file system and configure server processes for an upgraded system
  • Install a new database tier or application tier technology stack

Rapid Install employs a wizard that presents the screen flow associated with one of these operations. On the wizard screens, you enter configuration values for your system, and save them in a file (config.txt). When you run Rapid Install, you point it to that file so that it can use the parameters as it performs tasks such as creating the Oracle Applications file system, installing a fresh database, registering products, managing NLS requirements, configuring port connections, and creating and running the start and stop scripts for the database and listeners.

The main Rapid Install engine is AutoConfig. This tool simplifies and standardizes the management of your system configuration. AutoConfig uses the values in the configuration file to set up your system parameters, and then stores that information in a system-specific context file. At any time after the initial installation, you can change these values and run an AutoConfig script to populate the configuration files with the new values (using the Oracle Applications Manager AutoConfig tool). AutoConfig is delivered with and required for a new installation of Release 11.5.10.

Installing New Systems

With Rapid Install, you can set up a new installation using either a complete set of your own system-specific parameters, or a combination of a few key system-specific parameters and the Rapid Install default parameters. Both types (system-specific or express) offer the option of installing either a fresh database — one that is fully configured but contains no transaction data — or a Vision Demo database — one that contains transaction data for a fictitious company to use for training or demonstration purposes.

Upgrading an Existing System

As part of a system upgrade, you enter configuration parameters in the Rapid Install wizard and run Rapid Install as one of the pre-upgrade tasks (performed prior to running AutoUpgrade). It uses the parameters to lay down the file system and install the new technology stack. You must also migrate or upgrade your existing database to Oracle9i as one of the pre-upgrade tasks

Steps before starting Rapid Install

You must follow the steps in this section before you begin the installation. It is also important to be familiar with the other documentation referenced in this section.

Review Installation Plan and Documentation

Rapid Install handles the details of the installation or upgrade based on the information you enter on the Rapid Wizard screens. It’s a good idea to collect and review all the information necessary for responding to the wizard before you begin.

Create Login Accounts

You must set up user login accounts for the installation of both the database tier and the application tier file systems. The way you create login accounts differs somewhat between UNIX users and Windows users.

Install Java Development Kit (JDK)

This release of Oracle Applications requires JDK 1.4.2. Rapid Install installs it automatically on Solaris, Linux, and Windows operating systems. If your installation is on another platform, you must download and install JDK before you continue with the installation or upgrade.

Set Up the Stage Area

As preparation for running Rapid Install, you run a Perl script that creates the install directory and copies the contents of the Release 11i software bundle to the appropriate place in the file system.

Your installation software comes in DVD format. The individual disks included in the

Release 11i software bundle are labeled as follows:

  • Start Here - Disk 1
  • APPL_TOP - Disk n
  • RDBMS - Disk n
  • Tools - Disk n
  • Databases - Disk n

If you are an NLS customer, you should also have the NLS Supplement - Disk n software for each language (in addition to American English) you plan to install. You should order the NLS Supplement software and have it available before you begin the installation. Rapid Install requires this language-specific software to run to completion.

The stage area created by adautostg.pl looks like this: a top-level directory , with subdirectories startCD, oraApps, oraDB, oraiAS, oraAppDB, and oraNLS/ (only if required).

Starting Rapid Install

Once the stage directory is created, start Rapid Install as described in the following section.

UNIX:

$ cd /u01/Stage11i/startCD/Disk1/rapidwiz

$ ./rapidwiz


Windows:

C:\> f:

F:\> cd Stage11i\startCD\Disk1\rapidwiz

F:\Stage11i\startCD\Disk1\rapidwiz> rapidwiz.cmd

Thursday, January 31, 2008

Oracle Application 11.5.10 Installation on Linux Adv. Server

Operating System: Red Hat Enterprise Linux AS 3.0

First Node
Hardware Specification

Brand & Model: Dell Optiplex GX270
CPU: Pentium 4, Speed: 2.8GHz
HDD: 200GB
RAM: 2 GB


Required Packages:

compat-libstdc++-devel-7.3-2.96.122
libstdc++-devel-3.2.3-20
compat-gcc-7.3-2.96.122
compat-gcc-c++-7.3-2.96.122
compat-db-4.0.14-5
openmotif21-2.1.30-8
setarch-1.3-1
compat-libstdc++-7.3-2.96.122


Oracle Applications 11i (11.5.10) Installation:

Group creation
# groupadd dba

User Creation

User Name: appltest
Password: appltest
User ID: 501
Primary group: dba
Full Name: appltest
Login Shell: /bi/bash
Home Directory: /home/appltest


Stage Area Creation: (Enter the following commands)

# cd /applest
# mkdir Stage11i
# cd Stage11i
# mkdir oraDB
# mkdir oradata
# mkdir ora8i
# mkdir oraApps
# mkdir StartCD

# cd StartCD
# mkdir Disk1
# cd ..
# cd oraDB
# mkdir Disk1
# cd ..
# cd oradata
# mkdir Disk1
# mkdir Disk2
# mkdir Disk3
# mkdir Disk4
# cd ..
# cd ora8i
# mkdir Disk1
# cd ..
# cd oraApps
# mkdir Disk1
# mkdir Disk2

Oracle Applications 11i – RDBMS - Disk1
# mount /mnt/cdrom
# cd /appltest/Stage11i/oraDB/Disk1
# cp –R /mnt/cdrom/* .
# umount /mnt/cdrom
# eject cdrom


Oracle Applications 11i – Database - Disk1
# mount /mnt/cdrom
# cd /appltest/Stage11i/oradata/Disk1
# cp –R /mnt/cdrom/* .
# umount /mnt/cdrom
# eject cdrom

Oracle Applications 11i – Database – Disk2

# mount /mnt/cdrom
# cd /appltest/Stage11i/oradata/Disk2
# cp –R /mnt/cdrom/* .
# umount /mnt/cdrom
# eject cdrom


Oracle Applications 11i – Database – Disk3

# mount /mnt/cdrom
# cd /appltest/Stage11i/oradata/Disk3
# cp –R /mnt/cdrom/* .
# umount /mnt/cdrom
# eject cdrom


Oracle Applications 11i – Database – Disk4
# mount /mnt/cdrom
# cd /appltest/Stage11i/oradata/Disk4
# cp –R /mnt/cdrom/* .
# umount /mnt/cdrom
# eject cdrom


Oracle Applications 11i – Tools - Disk1

# mount /mnt/cdrom
# cd /appltest/Stage11i/ora8i/Disk1
# cp –R /mnt/cdrom/* .
# umount /mnt/cdrom
# eject cdrom


Oracle Applications 11i – APPL_TOP - Disk1
# mount /mnt/cdrom
# cd /appltest/Stage11i/oraApps/Disk1
# cp –R /mnt/cdrom/* .
# umount /mnt/cdrom
# eject cdrom


Oracle Applications 11i – APPL_TOP – Disk2
# mount /mnt/cdrom
# cd /appltest/Stage11i/oraApps/Disk2
# cp –R /mnt/cdrom/* .
# umount /mnt/cdrom
# eject cdrom


Download the latest Rapid Install Patch 4132885, p4132885_11i_GENERIC.zip from http://metalink.oracle.com
This patch contains the latest Rapid Install Wizard, version 11.5.10.33

Copy the p4132885_11i_GENERIC.zip file from CD to the 11i stage directory
# cp -r /mnt/cdrom/* /appltest/Stage11i/StartCD/Disk1

# unzip -o p4132885_11i_GENERIC.zip -d /appltest/Stage11i/StartCD/Disk1

Execute the following command to show the latest Rapid Install Wizard version 11.5.10.33
# cd /appltest/Stage11i/StartCD/Disk1/startCD/Disk1/rapidwiz
# sh RapidWizVersion
Version 11.5.10.33
#

Download the Patch 3006854, p3006854_9204_Linux.zip from
http://metalink.oracle.com
Copy p3006854_9204_Linux.zip file to /opt/Patch
# cd /opt/Patch
# unzip p3006854_9204_Linux.zip
# cd 3006854
# sh rhel3_pre_install.sh
Patch Installed
#


Login as root
Go to startCD
# cd /appltest/Stage11i/StartCD/Disk1/startCD/Disk1/rapidwiz
# sh rapidwiz

**Provide your feedback on this post.

Monday, January 28, 2008

Enabling DFF In Oracle Standard Forms

1. Identify Descriptive fields used in a form .


Go to Help -> Diagnostic -> Examine ->Block($DESCRIPTIVE FLEXFIELD)

2. Open Descriptive flexfield segment


Go to Setup ->Flexfields ->Descriptive ->Segments


3. Enable Descriptive Flexfield.


·Define Code , name & description for new descriptive flexfield
·Un-check Freeze Flexfield Definition


4. Define Segments for a flexfield

.Define Segment Name and Attibute.
.Define Valuset if any.


5. Compile the Flexfield


.Check Freeze Flexfield Definition.
.Compile the Flexfield to see effect on standard oracle form.


6. Flexfield on form

Sunday, January 27, 2008

Code Snippet for querying responsibilities and users in 11i Applications

1. During a migration project we were required to copy the responsibilities created in test instances to production. For this scenario, I have used the below query to find out the request groups and menus used by these responsibilities.

SELECT DISTINCT rtl.responsibility_name,
(SELECT DISTINCT application_name
FROM fnd_application_tl
WHERE application_id = r.application_id
AND source_lang = 'US') application,
(SELECT DISTINCT user_menu_name FROM fnd_menus_tl
WHERE menu_id = r.menu_id AND source_lang = 'US') menu, rg.request_group_name, DECODE (rule_type,'F', 'FUNCTION', 'M', 'MENU' ) exclusion_type, DECODE (rule_type, 'F', (SELECT DISTINCT user_function_name FROM applsys.fnd_form_functions_tl
WHERE function_id = fff.action_id AND source_lang = 'US'),
'M', (SELECT DISTINCT menu_name
FROM fnd_menus
WHERE menu_id = fff.action_id) )
exclusion_name
FROM fnd_responsibility_tl rtl,fnd_responsibility r, fnd_request_groups rg, applsys.fnd_resp_functions fff
WHERE rtl.responsibility_id = r.responsibility_id
AND (r.request_group_id = rg.request_group_id(+)
AND r.group_application_id = rg.application_id(+))
AND r.responsibility_id = fff.responsibility_id(+)
AND UPPER (rtl.responsibility_name) = UPPER ('&responsibility_name')
AND rtl.source_lang = 'US';

2. I use the below query to find out the responsibilities assigned to user in 11i with start and end dates.

SELECT fu.user_name, fr.responsibility_key, fur.start_date, fur.end_date
FROM apps.fnd_responsibility fr, apps.fnd_user fu, apps.fnd_user_resp_groups_direct fur WHERE fur.responsibility_id = fr.responsibility_id
AND fur.responsibility_application_id = fr.application_id
AND fur.user_id = fu.user_idORDER BY user_name

Customizations in Oracle Applications - Purchase, Inventory and Payables

Part A: Purchasing/Inventory

1. Item – Customer- Approved Supplier Trigger for PO

2. Item – Customer- Approved Supplier Trigger for RFQ

3. DFF Copy from Requisition to PO
4. DFF Copy from Requisition to RFQ
5. Quotation Workflow trigger

Part B: Accounts Payable

1.Prepayment Trigger


**Please don't implement any of the customisation's on to your application untill aware of the architecture/ process flow. These changes are done as per client's needs and may not fit into your process. This post is only for reference purpose.


Part A: Purchase/Invenotry

1. Item – Customer- Approved Supplier Trigger for PO

Business Requirement: A particular Item is approved for a particular Supplier by a particular Customer.

Customization: Customer field added in Approved Supplier List line level DFF. Trigger GS_DWE_PO_ASL_CUST_TRG_PO written.

Result: While making POs this trigger enforces that only the Item-Supplier combination which is approved by a particular Customer are chosen. If the same is not done, then it raises an application error.


TRIGGER GS_DWE_PO_ASL_CUST_TRG_PO
before insert or Update on PO_LINES_ALL
for each row
Declare

Cursor C1 is
Select c.vendor_id ASL_VENDOR_ID,
c.vendor_site_id ASL_VENDOR_SITE_ID,
c.item_id,
c.ATTRIBUTE10 as pasl_attribute,
a.VENDOR_ID PO_VENDOR_ID,
a.VENDOR_SITE_ID PO_VENDOR_SITE_ID,
a.ATTRIBUTE14 as poha_attribute
from PO_HEADERS_ALL a,
--PO_LINES_ALL b,
PO_APPROVED_SUPPLIER_LIST c
Where c.ITEM_ID = :New.ITEM_ID
And c.ATTRIBUTE_CATEGORY = 'Customer'
And a.ATTRIBUTE_CATEGORY = 'Header Details'
And a.ATTRIBUTE14 = c.ATTRIBUTE10
And a.PO_HEADER_ID = :NEW.PO_HEADER_ID;

Cur_Row C1%ROWTYPE;

Begin

Open C1;

LOOP
Fetch C1 into Cur_Row;

Exit when C1%NOTFOUND;

If (Cur_Row.ASL_VENDOR_ID <> Cur_Row.PO_VENDOR_ID)
Then
Raise_application_error(-20001,'Item-Supplier is not approved for this customer selected in DFF');
--exit;
Elsif ((Cur_Row.ASL_VENDOR_ID = Cur_Row.PO_VENDOR_ID) and (nvl(Cur_Row.ASL_VENDOR_SITE_ID,0) <> Cur_Row.PO_VENDOR_SITE_ID))
Then
Raise_application_error(-20001,'Item-Supplier Site is not approved for this customer selected in DFF');
-- exit;
Else
null;
End if;


END LOOP;
Close C1;

End;


2. Item – Customer- Approved Supplier Trigger for RFQ

Business Requirement: A particular Item is approved for a particular Supplier by a particular Customer.

Customization: Customer field added in Approved Supplier List line level DFF. Trigger gs_approved_supp_trg_rfq written.

Result: While making POs this trigger enforces that only the Item-Supplier combination which is approved by a particular Customer are chosen. If the same is not done, then it raises an application error.


TRIGGER gs_approved_supp_trg_rfq
before insert or update on PO_RFQ_VENDORS
for each row
Declare
Customer_Supplier_Error exception;
cursor c12 is

select
c.vendor_id as poasl_ven_id
,c.vendor_site_id as poasl_ven_site_id
,c.item_id as poasl_item_id
,c.attribute10 as poasl_cust_name
,a.attribute14 as poha_cust_name
,:NEW.vendor_id as porfq_ven_id
,:NEW.VENDOR_SITE_ID as porfq_ven_site_id
from
po_headers_all a,
po_lines_all b,
PO_APPROVED_SUPPLIER_LIST c,
po_rfq_vendors d
where
a.ATTRIBUTE_CATEGORY = 'Header Details'
and
c.ATTRIBUTE_CATEGORY = 'Customer'
and
a.attribute14=c.attribute10
and
b.item_id=c.item_id
and
a.po_header_id=:NEW.po_header_id
and
a.po_header_id=b.po_header_id
--and
-- d.po_header_id = :NEW.po_header_id
;


cur_row C12%ROWTYPE;

Begin

Open C12;

LOOP
Fetch C12 into cur_row;

Exit when C12%NOTFOUND;

if(cur_row.poasl_ven_id !=cur_row.porfq_ven_id) then
--Raise_application_error(-20001,'Item-Supplier is not approved for this customer selected in DFF');
Raise Customer_Supplier_Error;
elsif((cur_row.poasl_ven_id =cur_row.porfq_ven_id) and (nvl(cur_row.poasl_ven_site_id,0)!= cur_row.porfq_ven_site_id)) then
--Raise_application_error(-20001,'Item-Supplier is not approved for this customer selected in DFF');
Raise Customer_Supplier_Error;
else
null;
end if;

END LOOP;
CLOSE C12;

EXCEPTION
WHEN Customer_Supplier_Error THEN
FND_MESSAGE.set_name('PO', 'GS_INVALID_CUSTOMER_SUPPLIER');
FND_MESSAGE.set_token('MSG', 'Supplier not approved for the selected item and customer combination');
FND_MESSAGE.raise_error;

WHEN OTHERS THEN
RAISE_APPLICATION_ERROR(-20001,SQLERRM);

END;


3. DFF Copy from Requisition to PO

Business Requirement: We usually capture lot of information at header and line level DFF. Some of this information is repetitive in the Purchase cycle (Requisition to PO and Requisition-RFQ-Quotation-PO) and thus should be copied automatically.

Customization: Trigger gs_dff_copy_req2po written.

Result: As soon as the PO is auto created from the requisition, the required DFF fields are copied.

TRIGGER gs_dff_copy_req2po
after insert or update
on
PO_DISTRIBUTIONS_ALL
for each row
Declare

cursor DFFCOPY is

select distinct
a.REQUISITION_HEADER_ID as req_header_id
,TRIM(a.ATTRIBUTE_CATEGORY) as req_attribute_category
,TRIM(a.ATTRIBUTE10) as req_billable_status
,TRIM(a.ATTRIBUTE11) as req_project_number
,TRIM(a.ATTRIBUTE14) as req_customer_name
,d.PO_HEADER_ID as po_header_id

from


PO_REQUISITION_HEADERS_ALL a
,PO_REQUISITION_LINES_ALL b
,PO_REQ_DISTRIBUTIONS_ALL c
,PO_HEADERS_ALL d


where
((c.DISTRIBUTION_ID=:NEW.REQ_DISTRIBUTION_ID) OR (a.SEGMENT1=:NEW.REQ_HEADER_REFERENCE_NUM))
and
c.REQUISITION_LINE_ID=b.REQUISITION_LINE_ID
and
b.REQUISITION_HEADER_ID=a.REQUISITION_HEADER_ID
and
d.PO_HEADER_ID=:NEW.PO_HEADER_ID
;


/***** Declare cursor variabeles *****/

cur_row DFFCOPY%ROWTYPE;

BEGIN
OPEN DFFCOPY;
LOOP
FETCH DFFCOPY INTO cur_row;
EXIT WHEN DFFCOPY%NOTFOUND;

update
PO_HEADERS_ALL f
set
f.ATTRIBUTE_CATEGORY=cur_row.req_attribute_category
,f.ATTRIBUTE10=cur_row.req_billable_status
,f.ATTRIBUTE11=cur_row.req_project_number
,f.ATTRIBUTE14=cur_row.req_customer_name

where
f.PO_HEADER_ID=cur_row.PO_HEADER_ID
and
f.ATTRIBUTE_CATEGORY IS NULL
and
f.ATTRIBUTE15 IS NULL
;

END LOOP;
CLOSE DFFCOPY;

END;


4. DFF Copy from Requisition to RFQ

Business Requirement: We usually capture lot of information at header and line level DFF. Some of this information is repetitive in the Purchase cycle (Requisition to PO and Requisition-RFQ-Quotation-PO) and thus should be copied automatically.

Customization: Trigger gs_dff_copy_req2rfq written.

Result: As soon as the RFQ is auto created from the requisition, the required DFF fields are copied.

CREATE OR REPLACE TRIGGER gs_dff_copy_req2rfq
after insert or update
on
PO_LINE_LOCATIONS_ALL
for each row
Declare
cursor DFFCOPY is

select distinct
PORHA.REQUISITION_HEADER_ID as req_header_id
,TRIM(PORHA.ATTRIBUTE_CATEGORY) as req_attrib_cat
,TRIM(PORHA.ATTRIBUTE10) as req_billable_status
,TRIM(PORHA.ATTRIBUTE11) as req_project_number
,TRIM(PORHA.ATTRIBUTE14) as req_customer_name
,POHA.PO_HEADER_ID as po_header_id
from
PO_REQUISITION_HEADERS_ALL PORHA
,PO_REQUISITION_LINES_ALL PORLA
,PO_REQ_DISTRIBUTIONS_ALL PORDA
,PO_HEADERS_ALL POHA
where
POHA.PO_HEADER_ID=:NEW.PO_HEADER_ID
and
PORLA.LAST_UPDATE_DATE = POHA.CREATION_DATE
and
PORHA.REQUISITION_HEADER_ID = PORLA.REQUISITION_HEADER_ID
and
POHA.type_lookup_code = 'RFQ'
and
PORLA.ON_RFQ_FLAG = 'Y'
;

/***** Declare cursor variabeles *****/

cur_row DFFCOPY%ROWTYPE;

BEGIN
OPEN DFFCOPY;
LOOP
FETCH DFFCOPY INTO cur_row;
EXIT WHEN DFFCOPY%NOTFOUND;

update
PO_HEADERS_ALL a
set
a.ATTRIBUTE_CATEGORY=cur_row.REQ_ATTRIB_CAT
,a.ATTRIBUTE10=cur_row.req_billable_status
,a.ATTRIBUTE11=cur_row.req_project_number
,a.ATTRIBUTE14=cur_row.req_customer_name
where
a.PO_HEADER_ID=cur_row.PO_HEADER_ID
and
a.ATTRIBUTE_CATEGORY IS NULL
and
a.ATTRIBUTE15 IS NULL
;

END LOOP;
CLOSE DFFCOPY;


END;

5. Quotation Workflow trigger

This trigger checks if the Quotation from which a PO is being made is approved or not, if it is not then it raises an application error and blocks the creation of the PO.

The main query which selects a particular quotation number if it has been approved is pasted below. This query uses the wf_notifications table to pick out the quotations which have been approved.

select
to_number(substr(wfn.subject,instr(wfn.subject,'(')+1,instr(wfn.subject,')')-instr(wfn.subject,'(')-1)) as wf_qt_number
from
wf_notifications wfn
,po_headers_all poha

where
wfn.MESSAGE_TYPE='QTAPPRV'
and
substr(wfn.subject,1,1)='Q'
and
wfn.MESSAGE_NAME='APPROVER_TO_REQUESTOR_COMPLETE'
and
wfn.STATUS='CLOSED'
and
to_number(substr(wfn.subject,instr(wfn.subject,'(')+1,instr(wfn.subject,')')-instr(wfn.subject,'(')-1)) in
(select
poha.segment1
from
po_headers_all poha
where
poha.TYPE_LOOKUP_CODE='QUOTATION'
and
po_header_id in (select
poha.from_header_id
from
po_headers_all poha,
po_lines_all pola
where
poha.po_header_id=pola.po_HEADER_ID
and
poha.TYPE_LOOKUP_CODE in ('STANDARD', 'BLANKET')
and
poha.FROM_TYPE_LOOKUP_CODE='QUOTATION')
)


Part B: Accounts Payable

Business Requirement:


Payment should only be made to supplier when the PO has been ‘Accepted’ by him.Advance Payment should not be more than the same mentioned in Payment Terms. Also, ability to pay more than that amount should lie with few people (user) only.

Customization: Trigger GS_PREPAYMENT written.

Result:
1. Payment can only be made once PO is accepted by Supplier.
2. Prepayment cannot be done above the amount mentioned in Payment Terms. Only specified user can pay more than the amount mentioned in payment terms.

1. Prepayment Trigger


(to be added: check if invoice amount is more than agreed advance from payment terms)

TRIGGER GS_PREPAYMENT
BEFORE INSERT OR UPDATE ON AP_INVOICES_ALL
FOR EACH ROW
DECLARE

PREPAY_INVOICE_PO_ERROR exception;
PREPAY_INVOICE_CONFIRM_ERROR exception;
PREPAY_INV_UNAUTH_USER_ERROR exception;
PREPAY_INV_BYPASS_ERROR exception;

P_PO_Header_Id number;
P_Vendor_Type PO_VENDORS.VENDOR_TYPE_LOOKUP_CODE%TYPE;
P_User_Name FND_USER.USER_NAME%TYPE;

BEGIN


Select VENDOR_TYPE_LOOKUP_CODE
Into P_Vendor_Type
From PO_VENDORS a
Where a.VENDOR_ID = :New.VENDOR_ID;

If P_Vendor_Type = 'EMPLOYEE' Then
return;
End if;

Select User_Name
Into P_User_Name
From FND_USER a
Where a.USER_ID = :New.Created_By;


If :New.INVOICE_TYPE_LOOKUP_CODE = 'PREPAYMENT' and :New.PO_HEADER_ID is null
Then
Raise PREPAY_INVOICE_PO_ERROR;
End if;

If :New.INVOICE_TYPE_LOOKUP_CODE = 'PREPAYMENT' and :New.PO_HEADER_ID is not null Then
Select count(1)
into P_PO_Header_Id
from po_acceptances_v a
where a.ACCEPTED_FLAG = 'Y'
and a.PO_HEADER_ID = :New.PO_HEADER_ID;

If P_PO_Header_Id <> 1 Then
If nvl(:New.Attribute1,'x') = 'Y' and P_User_Name = 'PARVEZ' Then -- Hardcode. Pls change accordingly
return;
Elsif nvl(:New.Attribute1,'x') <> 'Y' and P_User_Name <> 'PARVEZ' Then
Raise PREPAY_INVOICE_CONFIRM_ERROR;
Elsif nvl(:New.Attribute1,'x') = 'Y' and P_User_Name <> 'PARVEZ' Then
Raise PREPAY_INV_UNAUTH_USER_ERROR;
Elsif nvl(:New.Attribute1,'x') <> 'Y' and P_User_Name = 'PARVEZ' Then
Raise PREPAY_INV_BYPASS_ERROR;
End if;
Else
return;
End If;

End if;

EXCEPTION
WHEN PREPAY_INVOICE_PO_ERROR THEN
FND_MESSAGE.set_name('SQLAP', 'GS_INVALID_PREPAYMENT');
FND_MESSAGE.set_token('MSG', 'PO Number required for creating the Prepayment invoice');
FND_MESSAGE.raise_error;

WHEN PREPAY_INVOICE_CONFIRM_ERROR THEN
FND_MESSAGE.set_name('SQLAP', 'GS_PREPAYMENT_PO_NOT_CONFIRM');
FND_MESSAGE.set_token('MSG', 'PO not confirmed. Prepayment can not be processed');
FND_MESSAGE.raise_error;

WHEN PREPAY_INV_UNAUTH_USER_ERROR THEN
FND_MESSAGE.set_name('SQLAP', 'GS_INVALID_PREPAYMENT_USER');
FND_MESSAGE.set_token('MSG', 'You are unauthorized for bypassing PO confirmation');
FND_MESSAGE.raise_error;

WHEN PREPAY_INV_BYPASS_ERROR THEN
FND_MESSAGE.set_name('SQLAP', 'GS_PREPAYMENT_BYPASS_PO');
FND_MESSAGE.set_token('MSG', 'Please set Bypass PO Confirmation to Yes before proceeding');
FND_MESSAGE.raise_error;

WHEN OTHERS THEN
RAISE_APPLICATION_ERROR(-20001,SQLERRM);

END GS_PREPAYMENT;